User Guide Branches

Setting up your web browser

We would recommend that you use Google Chrome when using PELHAM, ideally using a different ‘profile’ just for your Pony Club activities to keep it separate from your other personal or business accounts. To set up a new profile in Chrome, please follow the instructions here or view the video guide below.

Logging in to PELHAM

To access PELHAM visit the project site at https://pelham.pcuk.org and follow the “Branches Login” button at the top of the homepage.

Save some time!

Save the PELHAM project site to your web browser’s bookmarks/favourites listt – this will allow you quicker access each time you need to login or refer to the user guides.
 
How to Pin a frequently used page/view

Click on arrow next to “Recent” on the top left of the screen:


From the drop-down list that will appear click on the “Pin” symbol beside the relevant item, example Branch:

That view will now appear in the “Pinned” drop down list:

To unpin a view or record, click on the pin symbol

You will need to enter your Branch email address and the password given to you by the Pelham Project Team.

Once you are logged in, you will land on the ‘Active Branches’ page and your Branch Name will appear below.

Click your Branch Name and this will take you to the Branch Summary Page where you will find your Branch details.

Branch Summary Page

Here you will find the following sections:

  • Members
  • Coaches & Volunteers
  • Members/Coaches achievement history
  • General Branch details
  • Other useful information

Within each section there are different views available, for example in the ‘Members’ section you can change from viewing the ‘Current Branch Members’ to ‘Members expiring within the next 3 months’ by clicking the arrow next to the heading.

Changing your PELHAM password

If you would like to change your branch’s PELHAM password, please visit https://pelham.pcuk.org/resetpassword

You should do this anytime one of your PELHAM users leaves your branch committee, to ensure that they can no longer access the system.

Resetting your PELHAM password

If you have lost your PELHAM password and need to set a new one, please follow the steps below:

  1. Go to the PELHAM project site and click on the “Branches Login” button.
  2. On the Microsoft login page, click the “Forgotten my password” link:

3. If you have previously set a recovery email address or phone number, a code will be sent there to enable you to set a new password. If you have not set any recovery details, the request will go to The Pony Club Central office who will contact you with a new password.

How to view and edit details of an existing contact

Firstly, you need to select the individual’s record, from the main Branch Summary Page (above) or using the search option on the right-hand side of your screen, as highlighted below:

Double click on the contacts name and you will be taken to their Pony Club record:

 A contact can be an active member, expired member, parent, guardian, coach or volunteer. An individual contact can be allocated more than one contact role.

Don’t miss any info

 Anything marked with a ‘*’ symbol means it’s a mandatory field.

Contact Page – Summary Tab

This tab contains the following information about a contact:

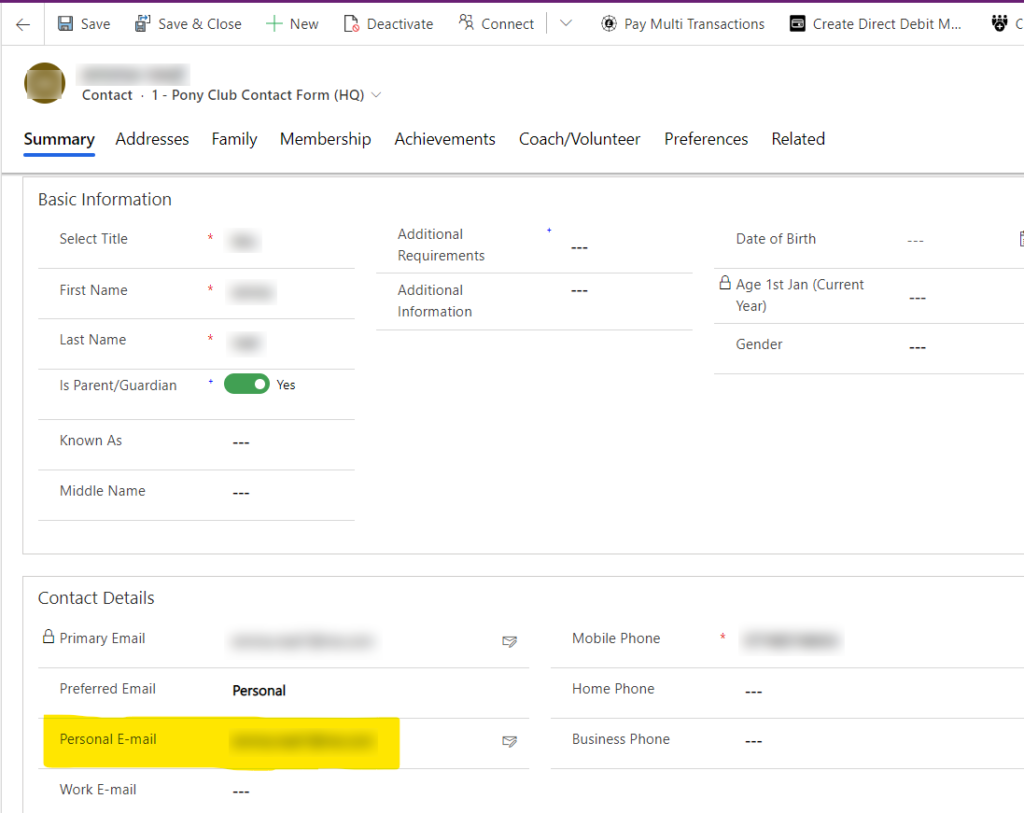
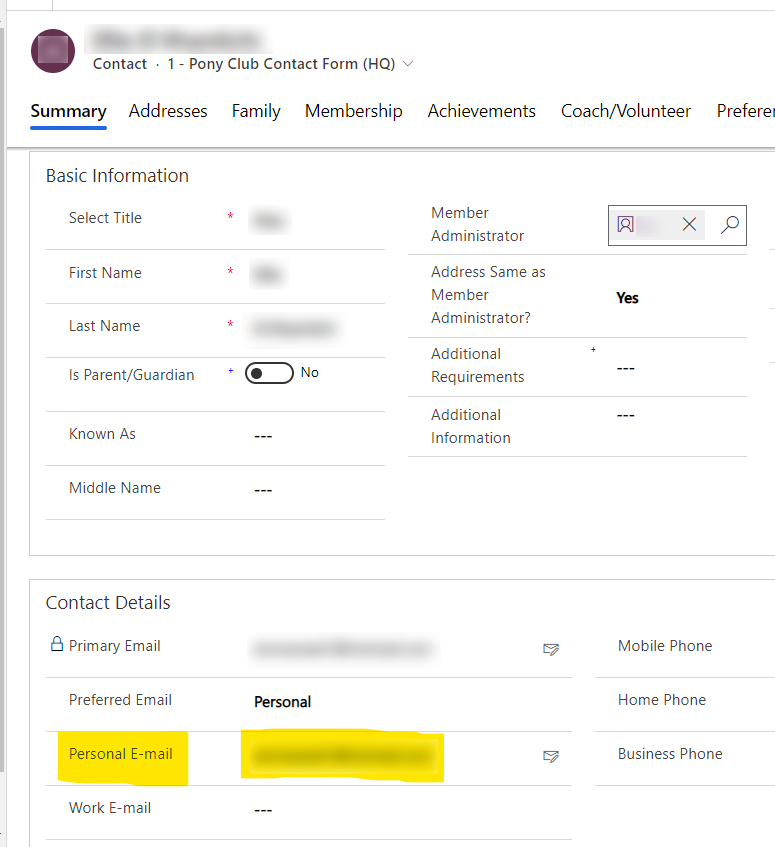
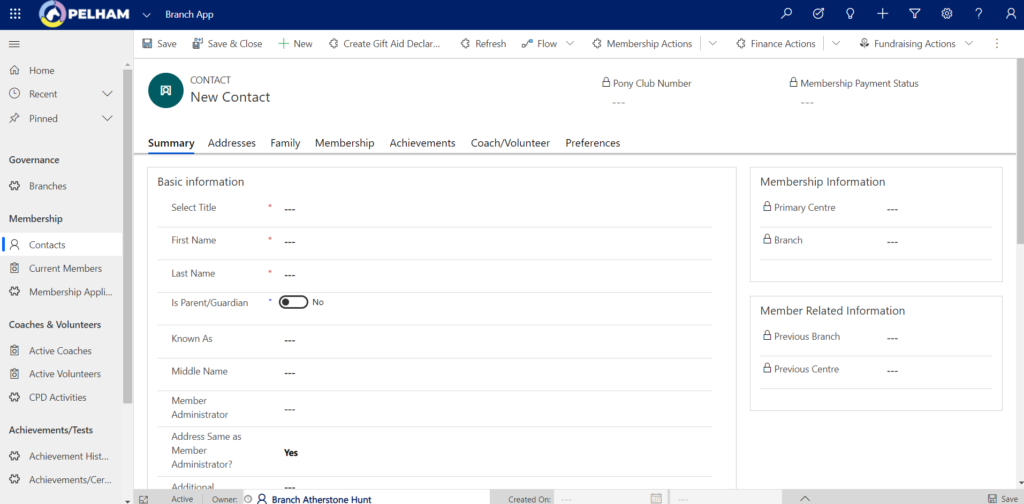
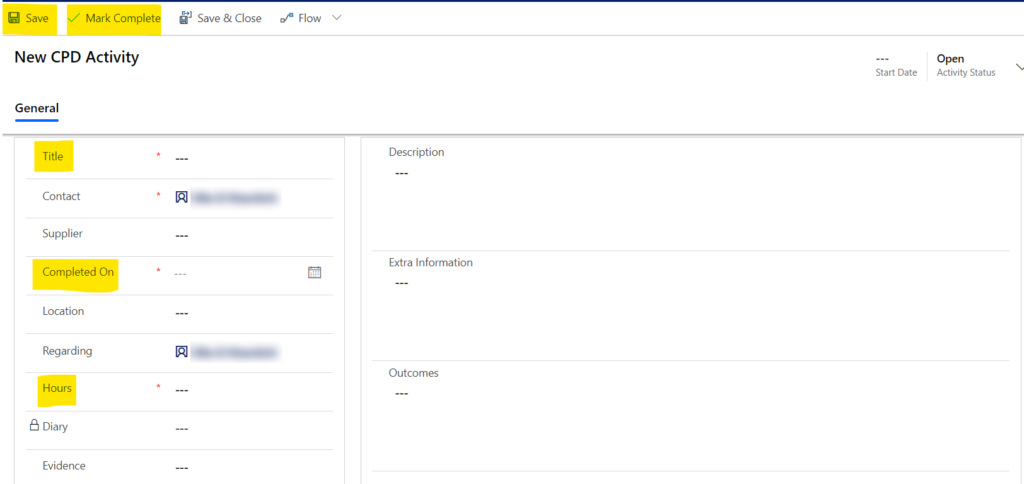
  • Update basic information – Title, First Name, Surname, DOB
  • Contact Details
  • Emergency Contact Information
  • Update contact email address

    Note: if you need to change the member administrator please contact the central office via https://pelham.pcuk.org/support (it may look like you are able to change it but the system will ignore the update and not allow you to save the changes).

Update contact email address

If you would like to change an email address in Pelham please firstly check on the child/members record to see if the email already exists there. If it does you will need to delete this before trying to add to the member administrator’s record.

  1. To change an email address for a member administrator
  2. Find the member administrators record
  3. Scroll down to the ‘Contact Details’
  4. Click in the box for ‘Personal E-mail’
  5. Remove the current address by pressing backspace to delete
  6. Enter the new email address into the ‘Personal E-mail’
  7. Then Save the record

If you see an error message like this pop up, it means the email address already exists in PELHAM and will not let you save the record until the duplicate email address has been removed.

If you select ‘Ignore and save’ the following error will appear:

  1. You will need to remove the email address from the record you are already on and find where else it already exists in PELHAM; this is most likely to be on the member’s record.

How to check for the email address on the member’s record:

  1. Find the member’s record
  2. Scroll down to the ‘Contact Details’
  3. Click in the box for ‘Personal E-mail’
  4. Remove the current email address by pressing backspace to delete
  5. You can now enter the member’s own email address or leave blank
  6. Then save the record
  7. You will now be able to add the correct email address to the member administrators record

PLEASE NOTE: You can only remove an email address from the ‘Personal E-mail’ field.

If you have checked the member’s record and still can’t see the email address please raise a support ticket and we will try to resolve the problem.

Contact Page – Address Tab

Updating an Address

Note: to change an address for multiple contacts, ensure you change the member administrator first, and their children will be updated automatically.

From the Addresses tab on the contacts record, click ‘Imported Address’ as highlighted below:

How to add new Achievements

1. From the ‘Achievements’ tab click ‘+New Achievement History’ as highlighted below:

Power up your search!

 When searching for a qualification it’s best to use an asterisk in front of the qualification, for example *Birds – this will search for any item which contains that word.

2. You will then be shown the ‘New Achievement History’ screen where you can add the achievement.

3. Fill in the Qualification and Date Achieved as highlighted below:

4. Finally Save & Close this screen.

Bulk Upload Achievements

How to bulk upload achievements

This will show how you can upload a of number of different achievements to more than one contact in one upload.

  1. Firstly, you need to prepare the data using the following template and save as a CSV file:

Note: You do not need to fill in the ‘Expiry Date’ column.

To download a copy of the template click below:

2. Next, select ‘Achievement History’ from the left-hand panel of Pelham, shown below:

You will be taken to the ‘Current Members – Achievement History’ screen.

3. On the right-hand side, you will notice an arrow next to ‘Import from Excel’, click this arrow and select ‘Import from CSV’ from the dropdown that appears:

Note: If there is not an ‘Import from Excel’ option visible, look for the 3 vertical dots as shown below:

Then ‘Import from Excel’ will appear. Next click the arrow and select ‘Import from CSV’:

4. Select ‘choose file’ and upload your CSV file, then click next:

5. On the next screen click ‘Review Mapping’.

6. Using the arrow next to ‘Name Your Data Map’ select ‘Achievement History Import’:

7. Finally click ‘Finish Import’ and your achievements will be uploaded.

How to deactivate an achievement (If you have entered the incorrect achievement)

1.Firstly, you need to find the achievement you wish to remove from a contact:

2. Double click on the achievement you wish to remove.

3. The ‘New Achievement History’ screen will load with the achievement you have selected.

4. Next click ‘deactivate’ in the top left of the screen as highlighted below:

5. Finally select ‘Deactivate’ and the achievement will disappear from the contacts record, if you wish to add the correct achievement you can now do so using the ‘+ New Achievement History’:

How to add a new Coach/Volunteer Role (to an existing contact)

Please note: only coach and volunteer roles can be added by the branch at this time.

  1. From the Branch Summary Page go to the ‘Coaches & Volunteers’ tab, you will notice ‘+New Contact Role’ click this to add a new role.

2. Next you need to fill in the form that appears, choose the role required (Coach, Volunteer etc), search for the existing contact and add the Branch. The area is not required.

3. Then Save & Close

Deactivated contacts aren’t lost forever!

 If you want to view your deactivated contacts, this can easily be done by switching the default view to “Deactivated Contacts” as shown below:

How to create a contact role for a new contact
  1. First we need to create the contact itself. Select ‘Contacts’ from the left-hand side of your screen – when the data loads you will be shown your Active Branch Members.

2. Then select ‘+New’ as highlighted below:

3. Once the New Contact form has loaded you need to fill out of the required information. Anything marked with ‘*’ symbol means it’s a mandatory field.
On the Summary tab, complete the basic information (Title, First Name, Surname, DOB) and the contact details if necessary:

4. Use the Save icon to save this information.

5. Next go to the ‘Coach/Volunteer’ tab and select ‘+New Contact Role’:

6. From the ‘New Contact Role form’ you need to choose the role required – Coach or Volunteer. Please note: when adding a coach role it doesn’t matter whether you choose Accredited, Supervised or Expired – in time this will update to reflect the qualifications the coach has.

7. Save & Close

How to remove a contact role from an existing contact
  1. Firstly, find the contact you wish to remove the role from using the search at the top of your screen. Then double click their name to go to their record:

2. From the contact record, click the tab ‘Coach/Volunteer’, then double click the role you wish to remove – try to avoid clicking on the contact name or their role, anywhere else within the highlighted box.

3. You will be taken to their specific contact role page, as highlighted below select deactivate to remove the coach role.

4. Finally, a confirmation screen will appear, select deactivate to remove the role.

Please note: If you are updating coach qualifications you must add a new achievement history – do not update/change the dates of any existing qualifications. If you make an error and notice after saving the qualification, you will need to deactivate the qualification and add again.

How to Add Coach Qualifications
  1. Firstly, search for the contact you want to add the qualifications to, by using the search at the top of your screen. Then double click their name to go to their record:

2. From the individuals record, select the tab ‘Coach/Volunteer’ and scroll down the page until you reach ‘Active Coaching Qualifications’.

3. Then click ‘+New Achievement History’:

4. From the ‘New Achievement History’ screen, search for the qualification one at a time and add the date achieved. You will notice the options to add badges here too but it’s best to ignore those options and just search for coach specific qualifications.

5. To search for specific coaching qualifications, follow the steps below:

  • Select the ‘looking glass’ next to the Qualification field:
  • From the drop down select ‘Change View’
  • Choose ‘Coach/Volunteer’
  • You will now see all coach related qualifications

6. You can add the following qualifications:

  • Safeguarding – Face to Face, or Online
  • First Aid – EFAW/1Day Certification, ESFAC Certification, FAW Certification and Medical Professional
  • Disclosure – Access NI Certification, DBS Certification, PVG Certification

7. Save and close this screen to add other qualifications.

Adding a disclosure certificate number
  1. Once you have selected the disclosure qualification and inputted date achieved, Save this screen.
  2. You will notice that a notes section appears under or next to the Achievement history screen.
  3. Here you can type the number, then save & close:
How to add CPD Activities
  1. Firstly, search for the contact you want to add the qualifications to, by using the search at the top of your screen. Then double click their name to go to their record:

2. From the individuals record, select the tab ‘Coach/Volunteer’ and scroll down the page until you reach ‘CPD Activities’:

3. Then click ‘+New CPD Activity’.

4. From the ‘New CPD Activity’ page you need to complete the fields marked with * (Title of the activity, check the contact is correct, date it was completed on and hours of the activity):

5. Finally save and mark this activity as complete (top left).

How to deactivate a coach qualification

If you have entered the incorrect qualification or date for the qualification, you will need to deactivate it as follows:

  1. Firstly, you need to find the qualification you wish to remove from a contact:

2. Double click on the qualification you wish to remove (Avoid clicking the blue text)

3. The ‘New Achievement History’ screen will load with the achievement you have selected

4. Next click ‘Deactivate’ in the top left of the screen as highlighted below:

Finally click ‘Deactivate’ on the confirmation window, and the qualification will disappear from the contacts record:

If you wish to add the correct achievement you can now do so using the ‘+ New Achievement History’.

Emails from PELHAM

Automated emails are sent from PELHAM to contacts depending on change in status. A summary of these is below:

Renewing members
  • The parent/guardian (Member Administrator) or member if acting on their own behalf, will receive an email for each member confirming the application has been successfully processed and advise the membership number and expiry date
  • If they have opted into Gift Aid, they will also get a separate Gift Aid confirmation email
New Branch Member process and email flow
  • If the member is brand new to the branch, and not subject to the transfer process, then the membership will be in “pending” status until the branch DC has approved it.
  • An email will be sent to the DC notifying them that a new member has been added to their Branch.
  • An email will be sent to the parent/guardian notifying them that their application is in progress.
  • Once the Branch DC approves the membership in Pelham, then the membership will be set to Active and an email will be sent to the parent/guarding confirming the membership, advising membership number and expiry date.
    NOTE: If a DC chooses NOT to approve this membership then the AR and office need to be notified ASAP to determine next steps, including finding an alternative branch and notifying the member.
Renewing/lapsed Branch member emails
  • When the membership from a previous year has been successfully renewed, with confirming information as above.
How to send ad hoc group emails
  1. From the landing page, you will need to select your Branch, for example Heythrop:

You will then be taken to the Branch Summary Page which is where you select the members/contacts you wish to email:

Please select the group you wish to email by selecting the view “Email – current Member administrators” and select the members you want to email by clicking the “tick” icon next to the Pony Club Number as highlighted above. You can use the very top “tick” icon, which will select the whole list, or you can select them individually.

2. Next you need to click on 3 dots on right side and select ‘Send Group Email’:

You will notice all emails are added to the BCC list

3. If you don’t need to add any more contacts to the list, proceed to step 5. If you need to add more contacts, select the magnifying glass next to the BCC list:

4. Scroll down to Look up more records and click:

5. A new window opens:

6. Click on the ‘Look in’ dropdown list and the usual lists will appear; scroll down to ‘Email Current members with email addresses’ (or whichever email list you require)

7. Tick to select all the contacts, press Select and ADD to add to the list:

8. They are then added to the BCC list and you are able to send the email. The “From” email defaults to the branch email address.

9. Finally press send and you can find the recently sent/created emails in the ‘Activities’ tab:

How to send ad hoc individual emails
  1. Select the contact you want to email and click RELATED and select Activities:

2. Click New Activity and select Email:

3. A new window opens to complete email subject and text:

4. Complete and press send. A copy of this email will be held in the Activities section as detailed above.

Example Emails
Gift Aid confirmation (sent to member administrator)
New membership application (sent to member administrator)
New membership application (sent to branch DC)
Confirmation of membership approval (sent to member administrator)
How to export data from PELHAM into Excel
  1. Select any of the following from the side panel of Pelham as highlighted below:
  • Contacts
  • Current Members
  • Active Coaches
  • Achievement History

Then choose the view showing the information you want to export:

Working with tablets

 If you are using an iPad or other tablet and wish to export data to Excel, we recommend using the ‘Open in Excel Online’ option:

2. You will notice the arrow by ‘Export to Excel’ here, you can choose the way you export the data. (If there is not an ‘Export to Excel’ option visible, look for the 3 vertical dots and you will find it here:

3. Finally download the file and save securely to your computer.